Welcome to the Chimera iXY Project!
0.0 Preamble
Chimera iXY is a DIY 3D printer with the primary goal of upcycling older Reprap-style FDM printers into a modern equivalent at a low cost. The top three design priorities from highest to lowest are reliablity, quality and speed.
This page is optimized for desktop viewing. This involves information about the latest revision, Chimera iXY v2.0.
Although the majority of the parts were made myself, a number of them involve models already created, measured and tested. Please check out the credits in Section 10.0 - Appendix for all the originally created models.
0.5 Changelog
Major Revision v2.0
The documentation and images are fully updated. Documentation overhaul and complete addition and details about all invidivual components, as well as the BOM.
Software Changes:- Klipper Firmware Support: Transition to klipper for more higher print speeds and more advanced features. Marlin continues to be supported.
- Raspberry Pi Zero 2W: Primary SBC for klipper. Fortunately compatible with MKS TS35 v2.0.
- Input shaping:ADXL345 based vibration resonance cancellation.
- Primary Enclosure Redesign: Expanded to house relevant klipper components.
- PSU Cooling: Changed 60mm > 120mm fan for silent profile.
- Frame Rigidity:Addition of final braces to frame to minimize vibration.
- Camera:Changed Frame Bracket to front.
- Filament routing:Optimized for general QoL when loading/unloading filament.
- E3D V6 Volcano: Due to a permanent clog, I was forced to switch to a new V6 sized nozzle.
- Direct drive: Switch from bowden direct drive extrusion system for non-rigid material printing and higher quality/flow rates.
- Gantry plate & Toolhead bracket redesigns: Optimized new gantry designs.
- Linear rail X-axis: Changed kinematics from T-slot > Linear rod. Issues with old system discussed below.
- Linear rod Z-axis: Finalized bed with remaining 2 linear rods to eliminate z-wobble.
- (Temporary) Purge Bucket:Used as an idling position for the nozzle.
- Spool holder v2.0:Optimized spool holder to accomodate heavier variants.
Major Revision v1.5
The documentation and images are partially updated, but all the files have been updated and added. Below is a list of all changed files:
- Anti-Vibration Feet Rev1.1: Minor changes to the anti-slip/vibration feet. Should be printed in two parts; tpu for the lower section and petg for higher section.
- Drag chain - Auxillary Rear Spine Mount: Two piece optional set to replace 15mm tube for cable routing at rear.
- Drag chain - Primary Hotend Frame Mount: The concept of retaining the original cable design from the Flsun i3 has been scrapped and replaced with a drag chain.
- Drag chain - Primary Hotend Gantry Mount: Connects to top of gantry front plate via two m3 bolts.
- V6 Hotend Retainer Bracket - Rev.1.5: Modification relative to front gantry plate changes. Uses 2x m2 bolts.
- Z axis linear bearing mount - Rev.2.0: Strengthened and modified based off testing results of Rev.1.0.
- X axis endstop switch mount: Houses the x axis endstop switch taken from Flsun i3.
- Gantry Front Plate Rev.1.5: Complete redesign based on testing results of Rev.1.0. Uses 3 22m bearings instead of 4 to form a triangle.
- Gantry Back Plate Rev.1.5: Rear plate for gantry. Also mounts SN08 inductive probe.
Other Additions and Changes
- BeePrint by Renzo added to onboard ESP8266 module for wifi printing and control.
- Removed miniton beaglecam v1.
- Added PrusaSlicer print profile.
- Input shaping and vibration calibration code also added.
1.0 Introduction
This document covers the detailed documentation of my DIY CoreXY build from two broken 3D printers, named ‘Chimera iXY’. The primary objective of this document is to keep track of everything as the printer was being built.

2.0 Background
This project started when I received a broken Mingda Magician X (Version 1). The mainboard and X-carriage daughterboard had shorted out due to a cheaply designed 20-pin ribbon cable. This printer remained as the ‘modern half’ of this build considering it used alot of standard parts seen today (v-slot extrusions, 625 bearings, 42BYGH family of steppers, etc.).

The second 3D printer used for this was the Flsun i3 2017. It was a very finicky machine that frequently ran into ‘ghost’ thermal runaway errors. I wanted to make it into something better, thus this printer became the ‘older’ part of this build.

3.0 Design
The following components and subsystems were incorporated into Chimera iXY:
| Flsun i3 2017 | Mingda Magician X |
|---|---|
| Stepper motors (E0, Z axis) | Stepper motors (α, β axis) |
| 2020 Aluminum extrusions | 24V 15A Powersupply |
| V6 Hotend | Bolts: M3-M6 |
| Roller Bearings | Leadscrews + Collars |
| Toothless Idler Pulleys | Toothed Idler Pulleys |
| Stepper Leadscrew Collet | Heated Bed |
| Mainboard MKS Gen L v1.0 | 30mm axial fan |
| Reprap Discount Controller | 4010 blower fan |
| Bolts: M3-M6 | 625 bearings |
| Nuts: M3-M6 | 24V 60W heater cartridge |
| 8mm Linear Rods (Not rails) | 8mm Linear Rod Bearings |
| GT2 6mm Belts | Cables (Stepper, Display, etc.) |
| PTFE Bowden Tube | Bowden Extruder Assembly |
| PTFE Couplings | NTC 100k thermistor |
* All fans from the Flsun i3 were not used since I moved from a 12V to a 24V system.
** Refer to BOM for additional required parts.
In addition, any parts not listed here have been purchased and is referenced in the BOM.
The table below shows the minimum specification requirements set at the beginning of this project, and have now been updated with experimental results:
| Property | Value |
|---|---|
| Physical Specifications | |
| Physical Dimensions (Rigid) | 510 x 426 x 565 mm |
| Physical Dimensions (Flexible) | 550 x 506 x 565 mm |
| Primary Chassis Material | Aluminum, Steel |
| Bracket Material | PET-G |
| Print Dimensions | 230 x 230 x 230mm |
| Movable Dimensions | 230 x 260 x 230mm |
| Mechanical Specifications | |
| Gantry Kinematics | Linear Rail 300mm (X), Linear Rod 8x410mm (Y) |
| Heatbed Kinematics | T8 Leadscrew, 4 8x331mm linear rods |
| Leveling | SN08 Induction Probe, Bilinear bed mesh |
| Motion | GT2 Belts & Idlers |
| Z Motors | NEMA 17 40, 42SHDC4023Z-23B |
| XY Motors | NEMA 17 40, 42BYGH439-B-20D |
| E Motor | NEMA 17 22, 42BYGH2303-B-22DP |
| Extruder System | E3D V6 Volcano (all-metal heatbreak) & Titan Extruder |
| Electrical Specifications | |
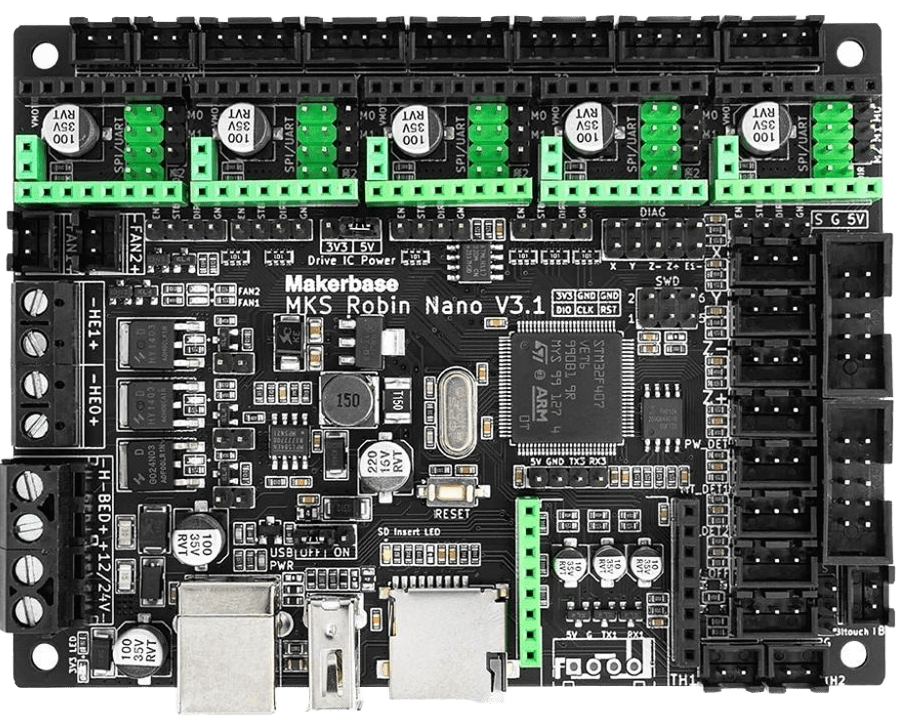
| Mainboard | MKS Robin Nano v3.1, Gen L vX.X and Tinybee compatible |
| Interface | MKS TS35 v2.0 480x320px LCD, MainsailOS via Wifi |
| Klipper SBC | Raspberry Pi Zero 2W |
| Camera | Miniton Beaglecam v1.0 |
| Secondary MCU | Mellow ADXL345 RP2040 |
| Maximum Power | ZL-260-24, 24V 15A |
| Peripheral Power | Hilitand GYVRM-K240505, 5V 5A |
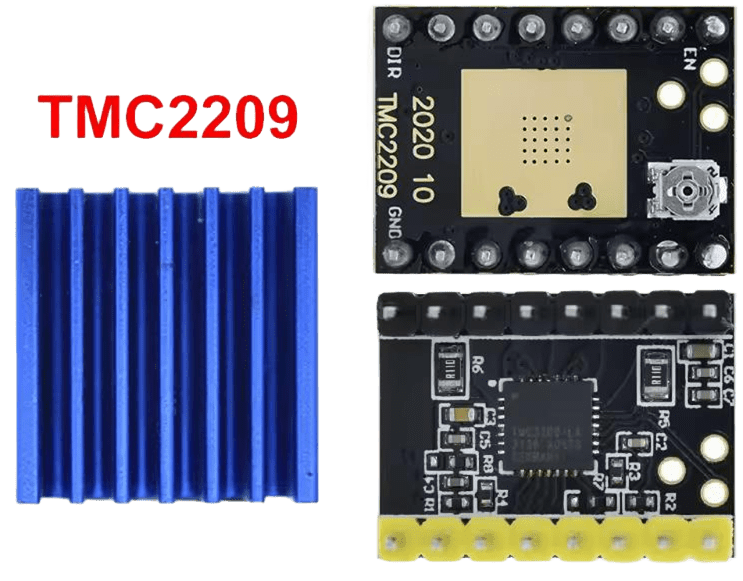
| Drivers | TMC2209 |
| Cooling | 2x120mm axial for MCU and PSU |
| Print Specifications | |
| Max Toolhead Speed | 800mm/s |
| Max Toolhead Acceleration | ~32700mm/s^2 |
| Max Hotend Flow | ~50mm/s^3 |
| Optimal Quality Print Speed | 200-450mm/s |
| Cooling | 3010 Axial for hotend, 2x4010 Blower for part cooling |
| Nozzle Diameter | 0.4mm, support for 0.2-1.2mm |
| Slicer used | Superslicer, Prusaslicer |
| Filaments supported | PLA, PETG, ABS, ASA, TPU, PA-CF, PC, PEEK |
| Max Temperatures | 350C hotend (dependent on nozzle), 125C bed |
4.0 Bill of Materials
The following is a complete list of the primary components required for the Chimera iXY build. Note that exact materials sourced from the 'INITIAL PARTS' section are the components I've had for a long time and as a result are not included in the cost of this.
| Component | Description | Qty | Cost | Source |
|---|---|---|---|---|
| Initial Parts | ||||
| FlSun i3 (C) 2017 | 3D Printer | 1 | === | Amazon |
| Mingda Magician X v1 | 3D Printer | 1 | === | Amazon |
| Miniton Beaglecam v1 | Monitoring IP Camera | 1 | === | Miniton |
| Twotrees PEI | 230x230mm Build Plate | 1 | === | Amazon |
| Electrical System | ||||
| Mainboard | MKS Robin Nano v3.1 (RIP MKS Gen L v1.0) & MKS TS35 v2.0 | 1 | $49.99 | Amazon |
| Power Supply | ZL-360-24 Generic | 4 | === | Amazon |
| TMC2209 UART | X-Y Axis | 2 | $8.18 | Aliexpress |
| TMC2209 Standalone | Z-E Axis | 2 | $6.59 | Aliexpress |
| 1M Heater Heating Tube + Thermistor | (3Pcs) 24V 40W & 100K 3950 | 1 | $6.25 | Amazon |
| Mellow 3D Printer Parts Klipper ADXL345 Accelerometer Board | Input Shaping Accelerometer w/ RP2040 for secondary MCU | 1 | $5.49 | Aliexpress |
| Dupont Line Jumper Wire | 20CM Male to Female for screen connection | 1 | $3.72 | Aliexpress |
| Raspberry Pi SC0721 | RPi Zero 2W for Klipper | 1 | $26.83 | Digikey |
| Mechanical System | ||||
| Linear Motion Rods | 8mm x 331mm for Y & Z axis | 6 | $38.07 | Amazon |
| 45x8mm Linear Bearings | For Z-axis bed | 4 | $6.98 | Amazon |
| 300mm 6063 Aluminum Square Tube | 15x15mm Outer Width | 1 | === | Amazon |
| JAYO PETG 1KG | Primary Color (RED) | 2 | ~$12.50 | Amazon |
| JAYO PETG 1KG | Secondary Color (BLACK) | 1 | ~$12.50 | Amazon |
| NEMA17-42 Stepper Heatsink | For X-Y axis | 2 | $3.72 | Aliexpress |
| M3, M4, M5, M6 Bolt Kit | 1 | $16.99 | Amazon | |
| M2, M3, M4, M5, M6 Bolt Kit | 1 | $18.88 | Amazon | |
| 2PCS GT2 20T Gear Aluminum Belt Pulley for 3D Printer | 2mm Pitch 5mm Inner Hole 6mm Wide | 2 | $6.20 | Amazon |
| 5 M GT2 Timing Belt | 2mm Pitch 6mm Width | 1 | $5.90 | Amazon |
| Brass Threaded Inserts for 3D Printing, M2 M3 M4 M5 | 1 | $11.92 | Amazon | |
| GYVRM-K240505 Converter 12V/24V to 5V 5A DC-DC | For 5V peripherals | 1 | $6.07 | Amazon |
| E3D Titan Extruder | Direct drive extruder | 1 | $18.07 | Amazon |
| E3D V6 Volcano | Replaces the permanently clogged original V6 | 1 | $33.98 | Amazon | TOTAL - $292.94 |
The above table also accomodates additional development costs that were made, e.g. iteration (so more filament) and the result of my mistakes, which include the permanently damaged V6 hotend and original Mainboard. The below table shows the total cost assuming no parts were damaged during assembly while keeping all essentials to run the same firmware/general specs.
| Component | Description | Qty | Cost | Source |
|---|---|---|---|---|
| Initial Parts | ||||
| FlSun i3 (C) 2017 | 3D Printer | 1 | === | Amazon |
| Mingda Magician X v1 | 3D Printer | 1 | === | Amazon |
| Miniton Beaglecam v1 | Monitoring IP Camera | 1 | === | Miniton |
| Twotrees PEI | 230x230mm Build Plate | 1 | === | Amazon |
| Electrical System | ||||
| Mainboard | MKS Gen L v1.0/td> | 1 | === | |
| Power Supply | ZL-360-24 Generic | 4 | === | Amazon |
| TMC2209 UART | X-Y Axis | 2 | $8.18 | Aliexpress |
| TMC2209 Standalone | Z-E Axis | 2 | $6.59 | Aliexpress |
| Mellow 3D Printer Parts Klipper ADXL345 Accelerometer Board | Input Shaping Accelerometer w/ RP2040 for secondary MCU | 1 | $5.49 | Aliexpress |
| Dupont Line Jumper Wire | 20CM Male to Female for screen connection | 1 | $3.72 | Aliexpress |
| Raspberry Pi SC0721 | RPi Zero 2W for Klipper | 1 | $26.83 | Digikey |
| Mechanical System | ||||
| Linear Motion Rods | 8mm x 331mm for Y & Z axis | 6 | $38.07 | Amazon |
| 45x8mm Linear Bearings | For Z-axis bed | 4 | $6.98 | Amazon |
| 300mm 6063 Aluminum Square Tube | 15x15mm Outer Width | 1 | === | Amazon |
| JAYO PETG 1KG | Primary Color (RED) | 2 | ~$12.50 | Amazon |
| JAYO PETG 1KG | Secondary Color (BLACK) | 1 | ~$12.50 | Amazon |
| NEMA17-42 Stepper Heatsink | For X-Y axis | 2 | $3.72 | Aliexpress |
| M3, M4, M5, M6 Bolt Kit | 1 | $16.99 | Amazon | |
| M2, M3, M4, M5, M6 Bolt Kit | 1 | $18.88 | Amazon | |
| 2PCS GT2 20T Gear Aluminum Belt Pulley for 3D Printer | 2mm Pitch 5mm Inner Hole 6mm Wide | 2 | $6.20 | Amazon |
| 5 M GT2 Timing Belt | 2mm Pitch 6mm Width | 1 | $5.90 | Amazon |
| Brass Threaded Inserts for 3D Printing, M2 M3 M4 M5 | 1 | $11.92 | Amazon | |
| GYVRM-K240505 Converter 12V/24V to 5V 5A DC-DC | For 5V peripherals | 1 | $6.07 | Amazon |
| E3D Titan Extruder | Direct drive extruder | 1 | $18.07 | Amazon | TOTAL - $202.72 |
5.0 Assembly - Mechanical
5.1 Frame
5.1.1 Metal Extrusion:
The partial 2060 from the x-axis of the MMX was split vertically using a manual hacksaw to make a 2040 and 2020; the 2040 was used in the front top portion. Various ends were tapped with an M5 thread but no holes were drilled into any extrusions. Many of the ones from the MMX came with holes, but only the front top uses them so they must be aligned accordingly.

5.1.2 Reinforcements: Please refer to the github repository for all models used. All 3 variants are used, as well as the ones that came with the Flsun and MMX.
| Index # | Filename | Description | Picture |
|---|---|---|---|
| Reinfocement brackets | |||
| 001 | Extrusion Brace External | Externally protruding reinforcement bracket. |

|
| 002 | Extrusion Brace Internal v2.0 | No protrusion reinforcement bracket. |

|
| 003 | Extrusion Brace Internal | No protrusion reinforcement bracket. Credits to Zuff for original. |

|
| 004 | Extrusion Brace Internal Long | Longer no protrusion reinforcement bracket. |

|
5.2 Mounting Brackets
Mounting brackets (CAD/STL files) are available in the GitHub repository.

5.3 Gantry
The X-gantry plate and hotend fan mounting bracket went through the most iteration. See the below diagram for assembly.

The Y-gantry is also configured as follows.

5.4 CoreXY Kinematics
For the X-Y axis, the idlers are vertically stacked and follows the below configuration:
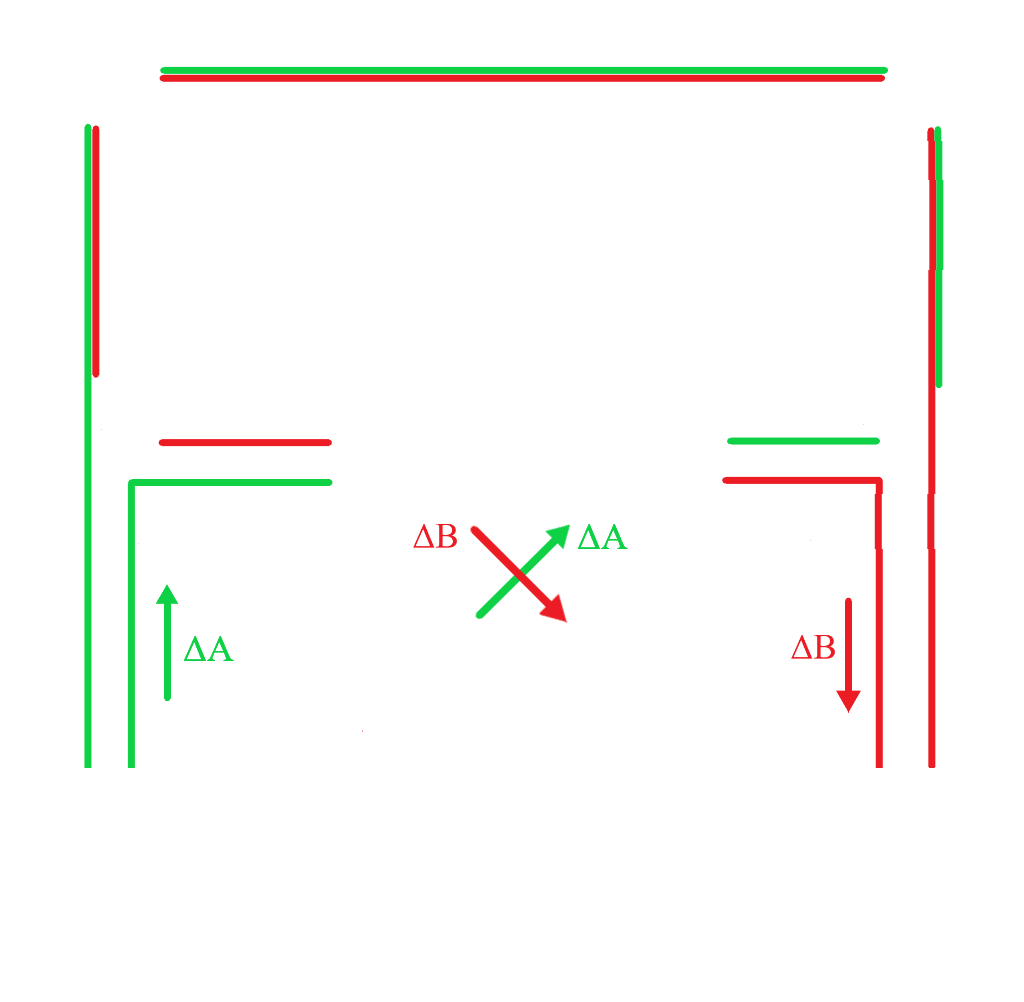
In order to tension the belts, idlers P1 and P2 on the front should be moved ~1 inch towards the extruder. The belts can now be installed with a fair amount of tension.
I realized during testing that all my prints came out inverted in both axes (e.g. text), since the origin was back left instead of front left like most other corexy configs. Setting the y endstop to POSITION_MAX and making klipper home to the max direction fixed this issue.
5.5 Bed Leveling
The SN08 inductive probe is used to level. Standard bicubic is used. After installing the 4 linear rods for the z-axis, the bed remained fairly level with a maximum absolute variance of 0.25mm. Below shows both the old t-slot leveling mesh and linear rail meshes; note how the variance for the t-slot gantry had a lot more deviation, which also shows that using the original bearings also had artifacts not just limited to VFAs, but also in the z-axis. I noticed this was well when performing the initial bed leveling test prints.


6.0 Assembly - Electrical
NOTE: This is entirely subjective. You can go with your own board as you want as long as it supports the necessary hardware/firmware.
6.1 Mainboard Choices
- MKS Gen L v2.1: Overall excellent choice but mine died shortly after.
- MKS TinyBee v1.0: Uses an ESP32. I ended up not choosing this as I wasn’t able to get UART mode to work with TMC2208s.
- MKS Robin Nano v3.1: I ended up going with this board. Supports UART mode natively, plenty of expansion and a built-in web server.
6.2 Drivers
TMC2209s were my preferred option for this. TMC2208s are also a valid option (even standalone), but I plan to implement sensorless homing so the 2209s were best fit.
6.3 Motor Choices
Choosing which motor best fitted for speed was a matter of ripping specs from online to see which speed torque curve was the best. I could not find too much information regarding the MMX, but measuring the coil inductance and comparing it to motors of similar length in the 42BYGH family, I was able to create a couple torque speed curves.
Credit goes to StepperSim by rcarlyle for the calculator. As expected, since both motors are equivalent in size but the 42BYGH is a few years newer, which most likely uses higher-grade neodymium versus older standard ferrite magnets in the 42SHDCs (despite MMX cheaping out on alot of parts, the motor typically comes from an external supplier and is advertised as a 'high torque motor' while the older ones are usually general purpose) the 42BYGH has a bit more torque at slightly higher speeds.
I'm currently running them at 1.2A RMS, which seems to provide a decent amount of torque at high speeds. I know these motors are thermally tolerant as they used to run at ~70-80C in the MMX without any sort of passive or active cooling (since the bed was unessecarily heavy), so it should run fine without issues.
Bowden based systems will use the 42SHDC4023Z-23B (flsun) for the extruder, or direct drive systems will use the 42BYGH2303-B-22DP (mmx) for the extruder.
- Flsun i3 motors (42SHDC4023Z-23B) - α, β (X/Y)
- MMX motors (42BYGH439-B-20D) - Z, E0


6.4 Power Supply
I opted for the 24V PSU from the MMX since the Flsun one was borderline about to explode.
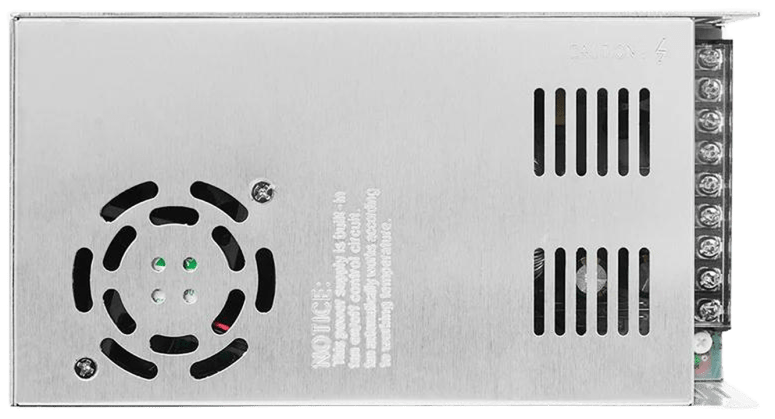
I have also used ZCH3's KP3S PSU 120mm fan adapter (ZL-360-24) since the original fan was pinned at 100% at all times and unnessecarily loud. Interesting that the manufacturer put a sticker on the psu, claiming this fan is 'temperature controlled'.

6.5 Hardware Diagram
See below for a high level hardware diagram with the appropriate wiring.

7.0 Firmware
7.1 Klipper Configuration
The repo contains configurations for Klipper and Marlin 2.1.2.5. Klipper continues to be prioritized and updated frequently, and Marlin also will continue to be supported.
Klipper printer.cfg:
# Chimera iXY v2.0 - Klipper Configuration Revision 1.0
# General Setup:
# CoreXY Kinematics
# MKS Robin Nano V3.1 + MKS TS35 v2.0
# RPi Zero 2W + Mellow Fly RP2040
# TMC2209 Drivers (UART X/Y, STANDALONE E/Z)
# Titan Extruder + V6 Volcano
# Last updated: 12-30-25

[include mainsail.cfg]
[include accelerometer.cfg]

[mcu]
serial: /dev/ttyAMA0
restart_method: command

[printer]
kinematics: corexy
max_velocity: 450
max_accel: 6400
max_z_velocity: 8
max_z_accel: 50

[virtual_sdcard]
path: /home/chimera/printer_data/gcodes
on_error_gcode: CANCEL_PRINT


#####################################################################
#      X/Y Stepper Settings
#####################################################################

#####################################################################
#      X/Y Stepper Settings
#####################################################################

[stepper_x]
step_pin: PE0
dir_pin: PB9
enable_pin: !PE1
rotation_distance: 32
microsteps: 16
full_steps_per_rotation: 200
endstop_pin: ^PA15
position_endstop: 0
position_max: 230
homing_speed: 65

[tmc2209 stepper_x]
uart_pin: PD7
run_current: 1.200
stealthchop_threshold: 5

[stepper_y]
step_pin: PE3
dir_pin: PE2
enable_pin: !PE4
rotation_distance: 32
microsteps: 16
full_steps_per_rotation: 200
endstop_pin: ^!PD2
position_endstop: 230
position_max: 230
position_min: -20
homing_speed: 65

[tmc2209 stepper_y]
uart_pin: PD5
run_current: 1.200
stealthchop_threshold: 5

[input_shaper]
shaper_freq_x: 114.6
shaper_type_x: mzv
shaper_freq_y: 45.0
shaper_type_y: ei


#####################################################################
#      Z Stepper Settings
#####################################################################

[stepper_z]
step_pin: PB5
dir_pin: !PB4
enable_pin: !PB8
rotation_distance: 0.5
microsteps: 16
endstop_pin: probe:z_virtual_endstop
position_min: -5.0
position_max: 230
homing_speed: 7
second_homing_speed: 2

#####################################################################
#      Extruder
#####################################################################

[extruder]
step_pin: PD6
dir_pin: PD3
enable_pin: !PB3
rotation_distance: 1
microsteps: 16
nozzle_diameter: 0.400
filament_diameter: 1.750
heater_pin: PE5
sensor_type: Generic 3950
sensor_pin: PC1
min_temp: 0
max_temp: 300
max_extrude_only_distance: 200.0
max_extrude_cross_section: 4.0
pressure_advance: 0.035


#####################################################################
#      Bed Heater
#####################################################################

[heater_bed]
heater_pin: PA0
sensor_type: Generic 3950
sensor_pin: PC0
min_temp: 0
max_temp: 150

#####################################################################
#      Probe & Mesh
#####################################################################

[probe]
pin: ^!PC8
x_offset: 4
y_offset: 40
speed: 3.0
lift_speed: 8.0
samples: 3
samples_result: median
sample_retract_dist: 2.0
samples_tolerance: 0.02
samples_tolerance_retries: 3

[safe_z_home]
home_xy_position: 115, 75
speed: 50
z_hop: 10
z_hop_speed: 5

[bed_mesh]
speed: 200
horizontal_move_z: 5
mesh_min: 20, 20
mesh_max: 210, 190
probe_count: 6, 6
algorithm: bicubic

#####################################################################
#      Fans
#####################################################################

[fan]
pin: PC14

[heater_fan hotend_fan]
pin: PB1
heater: extruder
heater_temp: 50.0

#####################################################################
#      Macros
#####################################################################

[gcode_macro START_PRINT]
description: Custom start macro
gcode:
    {% set BED_TEMP = params.BED_TEMP|default(60)|float %}
    {% set EXTRUDER_TEMP = params.EXTRUDER_TEMP|default(190)|float %}
    {% set LAYER_HEIGHT = params.LAYER_HEIGHT|default(0.2)|float %}

    G28
    PARK_PURGE

    M140 S{BED_TEMP}
    M104 S{EXTRUDER_TEMP}

    M190 S{BED_TEMP}
    M109 S{EXTRUDER_TEMP}

    BED_MESH_PROFILE LOAD=mesh1

    G92 E0.0
    G1 Z2.5 F3000

    G1 X5.0 Y5.0 Z{LAYER_HEIGHT} F5000.0
    G1 X5.0 Y55.0 Z{LAYER_HEIGHT} F1500.0 E10
    G1 X5.3 Y55.0 Z{LAYER_HEIGHT} F5000.0
    G1 X5.3 Y5.0 Z{LAYER_HEIGHT} F1500.0 E20

    G92 E0
    G1 E-1 F300
    G1 Z2.0 F3000

[gcode_macro END_PRINT]
gcode:
    G91
    G1 E-3 F300
    G1 Z10 F3000
    G90
    PARK_PURGE
    TURN_OFF_HEATERS
    M106 S0

#####################################################################
#      Filament Handling Macros
#####################################################################

[gcode_macro LOAD_FILAMENT]
gcode:
    {% set speed = params.SPEED|default(300) %}
    {% set max_velocity = printer.configfile.settings['extruder'].max_extrude_only_velocity %}
    G91
    G92 E0
    G1 E50 F{speed}
    G1 E50 F{speed}
    G92 E0
    G90

[gcode_macro UNLOAD_FILAMENT]
gcode:
    {% set speed = params.SPEED|default(300) %}
    {% set max_velocity = printer.configfile.settings['extruder'].max_extrude_only_velocity %}
    G91
    G92 E0
    G1 E25 F{speed}
    G1 E-100 F{speed}
    G92 E0
    G90

#####################################################################
#       Print State Management (Required for Pause/Resume)
#####################################################################

[pause_resume]

[display_status]

[gcode_macro PAUSE]
description: Pause the current print and store position
gcode:
    {% set velocity = printer.configfile.settings.printer.max_velocity %}
    G91
    G1 Z10 F600
    G90
    M83
    SAVE_GCODE_STATE NAME=PAUSE_STATE
    M117 Print Paused

[gcode_macro RESUME]
description: Resume the paused print
gcode:
    M117 Resuming Print
    RESTORE_GCODE_STATE NAME=PAUSE_STATE MOVE=1
    {% set hotend_temp = printer.lookup_object('extruder').target_temp %}
    {% set bed_temp = printer.lookup_object('heater_bed').target_temp %}
    M109 S{hotend_temp}
    M190 S{bed_temp}
    M82
    G90
    M117 Printing...

[gcode_macro CANCEL_PRINT]
description: Cancel the current print
rename_existing: BASE_CANCEL_PRINT
gcode:
    M117 Print Cancelled
    G91
    G1 E-3 F300
    G1 Z10 F3000
    G90
    PARK_PURGE
    TURN_OFF_HEATERS
    M106 S0
    CLEAR_PAUSE
    SDCARD_RESET_FILE
    BASE_CANCEL_PRINT
    M117 Ready

[gcode_macro PARK_PURGE]
description: Move the head to the purge bucket
gcode:
    {% if "xyz" not in printer.toolhead.homed_axes %}
        G28
    {% endif %}
    G90
    {% if printer.toolhead.position.z < 15 %}
        G1 Z15 F900
    {% endif %}
    G1 X20 Y-20 F6000

[adxl345]
axes_map: y, -x, z

[force_move]
enable_force_move: True

#*# <---------------------- SAVE_CONFIG ---------------------->
#*# DO NOT EDIT THIS BLOCK OR BELOW. The contents are auto-generated.
#*#
#*# [extruder]
#*# control = pid
#*# pid_kp = 30.535
#*# pid_ki = 1.655
#*# pid_kd = 140.845
#*#
#*# [heater_bed]
#*# control = pid
#*# pid_kp = 72.044
#*# pid_ki = 1.195
#*# pid_kd = 1086.058
#*#
#*# [probe]
#*# z_offset = 4.400
#*#
#*# [bed_mesh default]
#*# version = 1
#*# points =
#*# 	-0.146719, -0.216016, -0.187188, -0.220313, -0.106953, -0.062031, -0.274141
#*# 	-0.127344, -0.220078, -0.109609, -0.102344, -0.006875, 0.052656, 0.015547
#*# 	-0.067422, -0.111328, -0.028438, -0.016719, 0.095078, 0.180469, 0.203516
#*# 	0.016797, -0.023672, 0.087891, 0.106484, 0.226719, 0.343594, 0.464219
#*# 	0.020703, 0.107031, 0.208125, 0.181953, 0.327187, 0.464219, 0.619609
#*# 	0.045937, 0.063281, 0.204609, 0.305234, 0.460781, 0.606719, 0.685234
#*# 	-0.014063, 0.087734, 0.227344, 0.305859, 0.453203, 0.642031, 0.655391
#*# x_count = 7
#*# y_count = 7
#*# mesh_x_pps = 2
#*# mesh_y_pps = 2
#*# algo = bicubic
#*# tension = 0.2
#*# min_x = 20.0
#*# max_x = 209.96
#*# min_y = 20.0
#*# max_y = 170.0
#*#
#*# [bed_mesh mesh1]
#*# version = 1
#*# points =
#*# 	  0.139844, 0.090156, 0.038125, 0.006719, -0.033438, -0.084219
#*# 	  0.088281, 0.057344, 0.026406, 0.007187, 0.020000, 0.014375
#*# 	  0.036562, 0.035625, 0.018125, 0.017344, 0.058750, 0.092344
#*# 	  -0.060313, -0.070313, -0.067813, -0.030781, 0.030312, 0.093906
#*# 	  -0.177344, -0.154375, -0.144531, -0.095313, 0.005625, 0.080312
#*# 	  -0.346719, -0.294688, -0.248594, -0.172188, -0.073750, 0.030469
#*# x_count = 6
#*# y_count = 6
#*# mesh_x_pps = 2
#*# mesh_y_pps = 2
#*# algo = bicubic
#*# tension = 0.2
#*# min_x = 20.0
#*# max_x = 210.0
#*# min_y = 50.0
#*# max_y = 190.0
7.2 Input Shaping Results
For input shaping, the Mellow FLY-ADXL345-USB was used. Refer to the X-Gantry for mounting, and this Guide for setup.
In general, the frame is moderately rigid with a peak at one frequency in the x-axis, or approximately 170mm/s in SpreadCycle. The Y-axis has two peaks for some reason (possibly belts unevenly tensioned?), which is my primary limiting factor in acceleration with input shaper at <6400mm/s^2. I will make minor adjustments to this to hopefully get the acceleration up to at least 10k.


8.0 Resolved Issues
8.1 OrangePi + MKS Gen L v1.0 OctoPrint Integration
Issues encountered while setting up octoprint on an Orange Pi 2 W and MKS Gen L v1.0:
- Initial USB Serial Connection Fails.
- Corrupt Serial Text.
- No Communication Timeout Retry.
- Port Conflicts with Wyze/Docker.
- Serial Buffer Underrun at high baud rates.
Switching to the MKS Robin Nano v3.1 improved this slightly. I could not get the screen to work with this pi however (for some reason the ili9341 driver was no longer supported), even on older linux builds it would never work. This forced me to switch to the raspberry pi zero 2w.
8.2 V6 Extrusion Mount Front & Backplate
Despite the plates used to mount the V6 hotend being designed with precision, there is still a slight 1mm wobble. Temporary solution: Add 2 M5 eccentric nuts to the top bolts holding the bearings.
It was kept like this for a while, when I got to printing there were insane vfas caused by the effects of using bearings with t-slot. I have switched to an MGN12 300mm linear rail, while I got it at a low cost and expected it to be built as such, it has eliminated this issue entirely.

8.3 Thermal Runaway
Due to the cheap heater cartridge used from the MMX, I frequently get into thermal runaways. It aggressively oscillates at 20C differences. I had to purchase a new one since my others used 12V.,
9.0 Conclusion
In conclusion, I was able to get a working rig by the first revision, but there were many issues to be addressed. The second revision represents a machine that increases the quality and speed significantly while matching the same reliablity.
Below is a brief list of all the revisions I've made so far for log purposes.
- v0.5: Basic concept. Very simple kinematics with essential components, MKS Gen L v1.0 w/ Marlin.
- v0.6: Gantry toolhead w/ fan brackets. MKS Tinybee used temporaily.
- v0.9: Z gantry stablization. MKS Robin Nano v3.1 w/ Marlin.
- v1.0: Finalized basic extrusion system and general firmware.
- v1.1: Firmware bugfixes, hotend heater/thermistor replacement.
- v1.2: Full gantry toolhead redesign, extrusion fixes.
- v1.3: Bilinear bed leveling. More gantry toolhead optimization. Frame rigidity improvements.
- v1.5: Cable management. Final z-gantry stablizations.
- v2.0: Switch to Klipper firmware. Direct Drive Extruder. Linear rail x-axis.